How to write a sockey team
Here's everything you need to know to write your own sockey team:
- The game field
- RoboSockey rules
- Finding your way around
- Controlling your player
- Sending messages
- Setting up to write a team
- What you need to write
- Testing your team
The SoccerClient API
Send suggestions/comments to wessler@ai.mit.edu.
Quick and dirty instructions
- Come up with a team name, and find your team sub-captain. He or she
will tell you where to create a directory for your team. If you're on
the Spiders team, then it will be inside a directory called "Spider".
- Make sure your own sockey team name begins with a capital letter and
doesn't have any non-alphanumeric characters in it, and create a
directory with exactly the same name.
- On a Linux machine,
setenv CLASSPATH .:$TEAM_DEV_DIR:/com/web/docs/lab/olympics/99/\
events/sockey/SoccerApp.jar:/usr/local/java1.1.6/lib/classes.zip
where $TEAM_DEV_DIR is the directory above the one your
sub-captain told you about.
- You can start with one of the pre-defined players (like
Wanderer.java or Forward.java or Goalie.java), or copy the framework code.
- Change the olympics and sockey team names to match your team names
in the package statement, and start coding!
- To compile, type javac Player.java (if the player file you
just wrote was called Player.java).
- Create a team file.
- To test, cd to $TEAM_DEV_DIR and type java Sockey team1
[team2] where team1 is something like Spider.MyTeam.
If you don't include team2, you'll run against a bunch of placebos.
The Game Field
RoboSockey is played on an enclosed field with rounded corners:
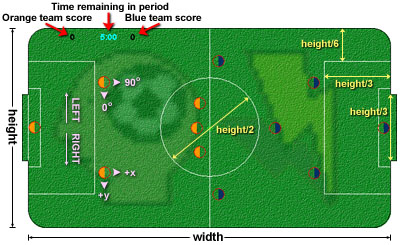
The sizes of the lines on the field are all related to the field
height. (Because the field is layed out with its major axis
pointing horizontally, the "height" measurement is what you may be more
used to calling "width". Sorry. Live with it.)
The center circle has a diameter of (height/2), and a radius of
(height/4). The goalie zones start at (height/6) from the edges, and
stick out (height/3) from the back wall. The goal is currently set at a
width of (height/3), although this value may change.
Forward is in the +x direction. The forward
angle is 90 degrees. Reverse is -x or 270
degrees, or (equivalently) -90 degrees.
If your player is facing forward, then right is at 0 degrees, in
the +y direction. Left is therefore at 180
degrees, in the -y direction. All of these coordinates
are shown in pink in the picture above.
You should always write code as if you are the orange (left-hand-side)
team. If your team happens to be blue, the physics server will
automatically convert all coordinates to look as if your team were on
the orange side.
RoboSockey Rules
Each team has six players: a center, two forwards, two defensemen, and
a goalie. Once every player has lined up, the ball will appear in the
kickoff spot (which appears as a small green circle in the middle of the
field), and play begins. [Note: although the positions have been given
descriptive names, there is no need to make the players behave as their
name suggests. Only the goalie has special privaleges, described below.]
The idea, of course, is to kick the ball into the other team's goal,
while preventing the other team from getting the ball into your own
goal. To kick the ball, a player must hit it with the solid half of
its body. The ball can slide right into the empty half, but other
players bounce off. A player can give the ball a good strong kick by
spinning its flat edge into the ball. Run the game a few times to see
how this works.
- Periods
- There are two halves. Each half lasts 5 simulated minutes, at 60
frames per simulated second. The real-time speed of the game depends on
the speed of your processor and your Java VM implementation.
Game time does not advance after a goal, or while the sides are setting
up for a free kick. If any player does not get into position and signal
the referee that it is ready after a significant amount of time, the
game is declared void, and the simulator quits. Players have about 60
simulated seconds to get into position (more than enough time).
The length of a period can be set as an applet parameter.
- Kickoff
- Kickoff happens at the beginning of each half, and whenever a team
scores a goal. The orange team kicks off at the start of the
first half; the blue team kicks off at the start of the second half,
and any team that gets scored on kicks at the next kickoff.
At any kickoff, every member of the team must be on its half of the
field, and the receiving members must be fully outside the kickoff circle
(height/4+getRadius() away from the kickoff location). There
are no other restrictions, but the default player lines up as shown
above.
- Penalties
- There are three conditions under which play is stopped and a free
kick awarded.
If the ball is within or partially within any player's
empty half for 3 consecutive simulated seconds without the player
touching it, the opposing team is awarded a free kick from the ball's
current position. If the ball would have been kicked off by a team
from within its large goalie box, the kickoff position is moved to the
nearest corner of the goalie box.
If the ball is within or partially within the goalie's empty half for 3
consecutive simulated seconds without the goalie touching it, then the
goalie's team gets a free kick from the closest corner of the goalie's
large box. This rule is only in effect if the goalie is within the
large goalie box.
If the ball is within the small goalie's box and the goalie does not
touch the ball for 5 consecutive simulated seconds, then the opposing
team is awarded a free kick from the center of the far edge of the
goalie box.
- Free Kicks
- During a free kick, the kicking team may position itself wherever it
wishes; the other team must be at least height/3 from the kickoff
location.
- Weird effects
- If the ball is within or partially within a player's empty half, that
player's acceleration strength is reduced to about 80% of other players.
This is meant to emulate the concentration a real player might need to
dribble the ball.
The goalie is twice as strong as every other player as long as it is
within the larger goalie box. The goalie may leave this box, but its
power is reduced to that of the other players while it is
outside.
The goalie's inner box has a force field around it that keeps all other
players (of both teams) out of the goalie's way. The force field begins
somewhat beyond the marked lines, and builds up in strength to prevent a
single player from staying inside the goalie's inner box. Multiple
players could probably line up to push a single player within the box,
but the goalie could easily knock them aside.
Finding your way around
To navigate, your player "pings" one of a large number of
invisible beacons on the field. Your player refers to these beacons by
their ping ID, and can get either the (x, y) distance to the beacon, or
the straight-line distance and angle to the beacon. [For more on the
coordinate system of the game field, see above.] The
lettered beacons are described below:
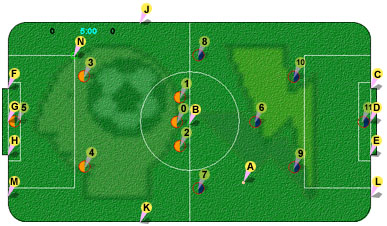
| A: | ID_BALL | The ball
location |
| B: | ID_CENTER | The center
of the field |
| C: | ID_THEIR_GOAL_LEFT |
The left-hand corner of the other team's goal. |
| D: | ID_THEIR_GOAL |
The center of the opposing team's goal line. |
| E: | ID_THEIR_GOAL_RIGHT |
The right-hand corner of the other team's goal |
| F: | ID_OUR_GOAL_LEFT |
The left-hand corner of our team's goal |
| G: | ID_OUR_GOAL |
The center of our team's goal line |
| H: | ID_OUR_GOAL_RIGHT |
The right-hand corner of our team's goal |
| Wall beacons are located at the point on the wall
closest to the player. |
| J: | ID_LEFT_WALL |
The closest spot on the left-hand wall |
| K: | ID_RIGHT_WALL |
The closest spot on the right-hand wall |
| L: | ID_FWD_WALL |
The closest spot on the other team's goal line |
| M: | ID_BACK_WALL |
The closest spot on our team's goal line |
| N: | ID_KICKOFF_LOC |
Where the ball will be placed for the next kickoff or free kick |
| Beacons are also attached to every player on the
field. You are not obliged to make your players behave as their names
suggest. |
| 0: | ID_PCTR |
The center player |
| 1: | ID_PFWDL |
The left-side offensive player |
| 2: | ID_PFWDR |
The right-side offensive player |
| 3: | ID_DEFL |
The left-side defensive player |
| 4: | ID_DEFR |
The right-side defensive player |
| 5: | ID_GOALIE |
The goalie. |
| To ping a player on the opposing team, add the
constant THEIR_TEAM to the player IDs given above. |
Controlling your player
Players move by accelerating in a certain direction with a
certain strength. Players spin by specifying a desired angle.
Think of acceleration as if each player is a space ship. To move to a
specific point, find the angle from the player to the point, and
accelerate in that direction. When you stop accelerating, the player
will take a while to slide to a stop; it's often a good idea to check
the distance against your player's velocity. Make a "guesstimate" of
where the player will be in several steps, based on its current location
and velocity. If your guesstimate is beyond the point you'd like the
player to stop at, accelerate in the opposite direction.
The wannabe function incorporates this idea.
Sending messages
Good team members coordinate their actions instead of acting
independently all the time. Your player can send messages to any or all
of the other members of your team through the sendMessage and
receiveMessage methods.
For example, suppose each player on your team needs to know where all
the other players on your team are (perhaps so you don't all bunch up).
You might keep the current locations of all of the players in an array.
You could have each player ping every other player at each time
step, but this is a tremendous waste of time. It makes much more sense
to have each player figure out where it itself is, and then broadcast
that location to each of the other players.
Here's how it might work. As the first part of the player's step, it
pings the ID_CENTER beacon. It now sends this location as a
message to the entire team (including itself).
The receiveMessage method identifies the ID of the sender, along
with the message. In this case, the message is simply the location of
the sender, so you can put the information in its proper place in the array.
Instead of each player making six pings, each player only makes one
ping, and shares the information with the other players.
[Knowledgeable Java programmers will be tempted to use static class
variables to pass data around. Through the magic of Java reflection,
the sockey server will detect this and disallow your player. You
must use the sendMessage / receiveMessage method for communication.]
Setting up
Get in touch with your team Sockey sub-captain. Your sub-captain will
tell you where to create your team directory. The directory must have
the same name as your Sockey team. You or your sub-captain can edit the
html file to tell the sockey applet about your team. Now you're ready
to start programming!
Each java class must be in the package MyTeam (or whatever you chose
your team name to be). To create a player, extend sockey.SoccerClient, and
override the step method. If you want to be clever, you can
also override freekick, receiveMessage, or
regroup.
You can use a template file to help you get
started. There is also full player code for (in incresing code complexity)
a Goalie, a Wanderer,
and a Forward, all from the Flash sockey team
of an imaginary Riddlers olympics team.
What you need to write
Each of your players is a subclass of the SoccerClient
class [API]. To make your
player do anything, you will need to override the step method.
This method should think briefly about what to do, do it, and exit. The
step method (or one of the other two methods below) will be
called repeatedly until the game is over. If you don't override
anything, you'll get a fully functional placebo.
- public void step()
- This method gets called while the game state is GAME_PLAYING. By
default, this method doesn't do anything, and your players will just sit
there like idiots. Override this to make your player do something
interesting (like scoring goals).
- public void freekick()
- This method gets called while the game state is GAME_FREEKICK. The
default behavior of this method is to send every player except the
goalie a distance of height/3 away from the kickoff location.
Depending on the kickoff location, one player from the kicking team
(either the left defender, the right defender, or the center) will
approach the ball for the kick. If you'd like the other players to do
something interesting, override this method.
- public void regroup()
- This method gets called when the game state is GAME_STARTING or
GOAL_SCORED. By default, each player moves to its standard starting
position. If you don't like the standard starting position, you can
have the players move to other locations, or even have them wander
around.
The only other overridable method is receiveMessage(int from, String
message, int a, int b, int c).
If your players talk to each other, you'll need to
override this method to do something interesting with the information.
You'll definitely want to check out the full API of
SoccerClient.
To add some pizaz to your team, create a gif or jpg logo for your
team. This logo must be called team.gif or
team.jpg. Put it in the directory with your team file
(see below) and .class files. For best results, make the logo
32x32 pixels, although the logo can be any size you want.
Testing your team
Once you've written your player classes, you'll want to test them to see
if they work, and how well they play. To do this, you'll first need to
create a file that tells the sockey applet what class to assign each
player. This is called the team file. See the
team file documentation page for information
on how to write this file.
If you've set up your CLASSPATH environment variable correctly, you
just need to type java Sockey Spider.MyTeam if you're on the
Spiders and your Sockey team is called "MyTeam". If you want to see
your team play against someone else, include their sockey team after
yours as another argument.
There are a few extra flags you can supply to the Sockey application.
Try java Sockey -help to list them.
Your team sub-captain may have set up an applet file so that you can run
the full interface. If so, you'll need to edit the applet file so that
it knows about your team. (The applet file is probably called
"applet.html" in your $TEAM_DEV_DIR).
Let's suppose the name of your team is "MyTeam".
The applet needs to look like this:
<applet archive="SoccerApp.jar" code="SoccerApplet.class" width=500 height=180>
<param name="TEAMS" value="MyTeam">
</applet>
If you have more than one team that you'd like to add to the list, use a
vertical bar ( | ) to separate the names:
<param name="TEAMS" value="MyTeam|GoodGuys">
To run the applet, use appletviewer applet.html